Tree removal is a vital service for maintaining safe and healthy landscapes. Dead or damaged trees pose significant risks. Their removal prevents property damage and personal injury. Professional care ensures the process is efficient and controlled.
Unexpected tree falls can happen during storms. High winds and heavy rain weaken branches and trunks. Trees near homes or power lines are especially hazardous. Prompt removal reduces the chance of accidents.
Tree removal involves more than cutting down trunks. Roots must be carefully extracted to prevent soil disruption. Stumps are often ground to avoid regrowth or tripping hazards. Skilled operators manage the process with precision.
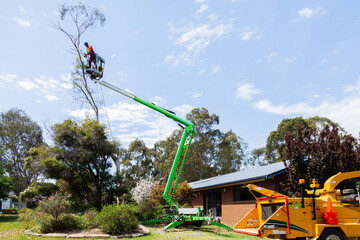
Large trees require specialized equipment for safe removal. Cranes, ropes, and saws help control the fall direction. This prevents damage to nearby structures and vegetation. Safety planning is essential for every removal project.
Emergency tree removal is common after storms. Fallen trees can block driveways and roads. They may also damage fences or vehicles. Rapid intervention restores safety and accessibility.
Tree removal can improve landscape aesthetics. Overgrown or crowded trees affect sunlight and airflow. Removing select trees opens space for gardens or outdoor activities. Proper planning balances beauty with environmental health.
Some trees are removed due to disease or infestation. Infected trees can spread pathogens to nearby plants. Removing them protects overall garden or forest health. Professionals identify risks before removal.
Tree roots can interfere with plumbing or foundations. They may crack pipes or destabilize structures over time. Removal prevents costly infrastructure damage. Expert assessment ensures correct intervention.
Tree removal supports property development. Land clearing is often required for construction or landscaping. Trees are safely removed without harming surrounding areas. Controlled removal prepares the site for new projects.
Environmental considerations are important in tree removal. Trees play a role in carbon absorption and habitat support. Removal is balanced with replanting or conservation efforts. Sustainable practices minimize ecological impact.
Tree size and location dictate removal strategy. Large urban trees demand careful planning. Residential trees near homes require precision techniques. Professionals adapt methods to each unique scenario.
Stump grinding is an essential follow-up to tree removal. It prevents insect infestations and regrowth. Stump removal also improves yard usability. Equipment is chosen based on stump size and location.
Tree removal helps prevent fire hazards. Dead or dry trees are highly flammable. Clearing these reduces wildfire risks in vulnerable areas. Professionals prioritize safety in high-risk zones.
Seasonal timing can influence tree removal decisions. Trees are often removed during dormant seasons. This minimizes impact on wildlife and surrounding vegetation. Seasonal planning enhances ecological responsibility.
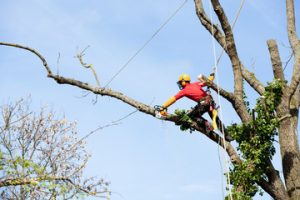
Specialized knowledge is required for tree removal near power lines. Contact with electricity is extremely dangerous. Licensed professionals follow strict protocols. Safety for both workers and residents is guaranteed.
Tree removal can improve garden health. Overcrowded trees limit sunlight for shrubs and flowers. Removing select trees allows better growth and photosynthesis. Proper evaluation maintains ecological balance.
Old trees sometimes require removal due to instability. Signs include leaning trunks, cracks, or hollow sections. Structural failure can endanger nearby structures. Professional assessment determines the safest course of action.
Tree removal supports urban planning and infrastructure maintenance. Sidewalks, roads, and underground utilities may be affected by roots. Clearing trees ensures smooth operation and accessibility. Precision reduces disruption to city life.
Emergency crews may need to remove trees blocking roadways. Fallen trees can disrupt transportation and emergency services. Quick removal restores access and safety. Advanced equipment allows efficient operations in challenging conditions.
Tree removal is linked to landscaping redesign. Clearing trees makes space for outdoor features. Patios, pathways, and water features benefit from strategic removal. Planning ensures both beauty and functionality.
Hazardous trees require careful analysis before removal. Experts assess stability, proximity to structures, and potential risks. Decision-making balances safety and preservation. Removal is executed with minimal impact on surroundings.
Tree removal can be part of forest management practices. Selective removal controls disease, overcrowding, and promotes healthy growth. Thinning ensures survival of remaining trees. Long-term ecological health benefits from strategic interventions.
Fallen limbs and debris pose risks even after tree removal. Cleanup prevents tripping hazards and pest infestations. Proper disposal follows environmental regulations. Safety and aesthetics are restored efficiently.
Tree removal services also include transplanting options. Healthy trees may be relocated instead of destroyed. This preserves vegetation and landscape integrity. Professional techniques ensure survival during relocation.
Tree removal helps manage invasive species. Some trees outcompete native plants, reducing biodiversity. Removing invasive trees restores balance to ecosystems. Specialists identify species and plan interventions carefully.
Equipment used in tree removal continues to evolve. Chainsaws, chippers, and cranes are enhanced for safety and efficiency. Protective gear reduces injury risks for operators. Technology allows faster, more precise removal processes.
Soil and root management is a key aspect of tree removal. Extracted roots may impact surrounding plants or structures. Professionals evaluate soil stability after removal. Correct handling maintains landscape integrity.
Tree removal also improves sunlight and airflow in urban areas. Dense canopies can block light and reduce ventilation. Clearing trees supports plant health and outdoor comfort. Thoughtful planning balances shade with exposure.
Tree removal requires skilled planning in narrow or confined spaces. Gardens, backyards, and urban plots demand careful techniques. Professionals use rigging, sectioning, and controlled cuts. Precision prevents damage to adjacent areas.
Tree preservation is considered when possible. Pruning and partial removal may suffice. Professionals assess the healthiest approach to maintain greenery. Decisions focus on both safety and environmental impact.
Tree removal contributes to soil erosion control when managed carefully. Clearing certain trees may require planting ground cover. Stabilizing soil prevents runoff and degradation. Balanced planning minimizes long-term landscape risks.
Tree removal is often coordinated with municipal regulations. Permits may be required for urban or protected areas. Compliance ensures legal and safe operations. Professionals navigate these requirements efficiently.
Tree removal enhances overall property safety. Risk mitigation reduces accidents and liability. Healthy, accessible landscapes support family and community well-being. Proper execution balances aesthetics, safety, and ecology.
Emergency removal is sometimes required for storm-damaged trees. Lightning, heavy wind, and ice can create hazardous situations. Rapid response prevents secondary property damage. Skilled crews handle dangerous conditions efficiently.
Tree removal supports ecosystem restoration projects. Removing diseased or invasive trees promotes native species growth. Healthy biodiversity ensures long-term resilience. Strategic removal fosters ecological balance.
Tree removal is also relevant for recreational spaces. Parks and trails require clear and safe pathways. Removing hazardous trees prevents accidents for visitors. Proper planning maintains natural beauty while enhancing safety.
Professional tree removal considers long-term landscape vision. Decisions factor in growth patterns, neighboring vegetation, and property goals. Strategic removal supports sustainable development. The outcome harmonizes functionality and aesthetics.
Tree removal services often include site cleanup and grading. After removal, soil may need leveling for planting or construction. Proper post-removal care restores landscape usability. Professionals ensure minimal disruption to the environment.
Tree removal is critical for maintaining urban tree health. Removing weak or diseased trees prevents spread to others. Strategic thinning encourages growth and sunlight penetration. Careful management sustains long-term greenery.
Tree removal is a complex process blending safety, ecology, and design. Professional assessment ensures the best approach for each scenario. Equipment, skill, and planning minimize risks. Completed projects restore safety, beauty, and landscape health.
Tree removal requires coordination between arborists, property owners, and municipal authorities. Planning, permits, and safe execution are crucial. Experts manage every stage to ensure efficiency. The result is a secure, functional, and aesthetically pleasing environment.